RONCHI RIGS
Starter Rig
GOTO RONCHI INDEX
Copyright – P. J.
Smith
But
permission is given to distribute this material in unaltered form as long as it
is not sold for profit.
This has been designed to :-
·
use only materials readily available anywhere in the
world. Although plastic (6 mm thick)
has been used for the frame, any convenient material such as thin plywood, aluminium or any easily shaped and drilled
material is suitable.
·
be usable with a good quality grating extending over
the LED – ie. with no slit. Remember,
do this ONLY with an Edmonds or other quality etched and filled grating.
·
be usable with a grating substitute in conjunction
with a slit
·
allow the slit adjustment lever to quickly clip on and
off to facilitate alignment of the test with a bare, bright, LED
·
have very smooth control over the tilt of the slit
when the tilt lever is clipped in place
·
have height adjustment via the clip holding the
testing head to the main post
·
be easy to exchange the grating for a knife edge or
wire
·
leave room for your nose and face – thus the grating
is offset. The example photographed
below is to be used with the left eye. The entire unit should stand about 10
inches high and the cut-out on each side should be large enough for your nose.
It would be
possible to make something similar in a variety of ways, and, depending on
available materials and
your ability to shape and machine materials, you may
prefer to do just this.
If you have a
quality grating you can of course omit the slit mounting and adjustment lever.
At the end of this
document is a photograph of the
simplest possible rig which can be used
with a quality
grating in the grating/grating mode.
I do recommend
you make provision for using a slit, however, because it provides for a much
greater variety of testing. It is
possible to make something really crude using nothing but blue tac to hold the
grating and LED, and it will work, but you will want to use if often when
figuring a mirror and something a little more permanent is worth while.
If you do decide
on something else, make sure all of the features of this rig are in some way
included.
It might look
crude, but it has been carefully thought out and been tested in use.
Note that no
special calibrated slide is necessary.
SUGGESTED STARTER
KIT TEST RIG

Set up with a
substitute grating and slit
Three thumb tacks
act as feet underneath the base so it will not rock.
The base and post can of course be made of anything
convenient. 16 mm plywood was used in
this case. The wooden block simply
gives rigidity to the post.
The holder for the Ronchi Grating is a commonly
available 35 mm slide mount held with a bulldog clip. This is versatile, protects the grating, and is convenient if you
wish to experiment and make many quick changes. It is a particularly good way to mount a woven grating
substitute, as it is easy to stretch the material when it is mounted.
.
Front view when
used with a slit
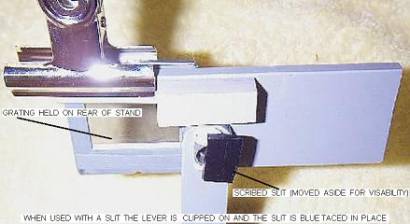
When used with a slit the grating is best clipped onto
the rear of the frame.
It does not
matter if it is in a slightly different plane compared to the slit.
The diffuser has been fine ground onto the rear of the
scribed slit.
Note that the slit
held by blue tac has been moved sideways in this illustration so the LED holder
is visible.
The thick block on the top is so the grating may be
clipped over the front if no slit is used.
This situation is shown below.
Grating extended
over LED and diffuser.
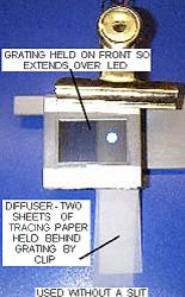
The diffuser is
made of two sheets of tracing paper held between grating and the stand.
The diffuser is
extremely important, especially when no slit is used. In my opinion, lack of a good diffuser is one of the commonest
faults making for substandard Ronchigrams when used in the grating/grating
mode.
Assembly
The LED holder is part (B) of a commonly available pen
and
The removable pivot (A) is the other clip on part of
the pen.
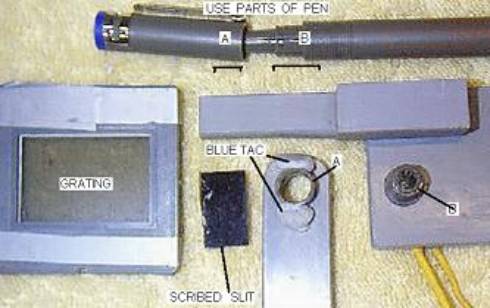
Both these parts are cut from the pen (marked above)
and are
tightly pressed into holes in the plastic to hold them
in place.
If the holes in the plastic are drilled about .005
inch undersize, the small parts of the pen may be pressed into place. No glue is needed. Check that the pen parts snap together and stay in place, pivot
smoothly, yet hold firmly when set to angle.
To unclip the lever you may find a small screwdriver placed between the
lever and frame helps to pop off the lever assembly.
The LED is pushed in from the rear and glued in place
in the part of the pen B. Be careful in
that some LEDs require a dropping resistor in line, some do not. There is no reason a small incandescent bulb
cannot be used, but the LED has the following advantages.
·
Very small, especially it has a short length. This means it gets in the way less. I would suggest the standard small LEDs
because they are large enough, but less obtrusive.
·
The built in
collimating shape of the face of the LED produces an evenly illuminated
spot. Do NOT grind off the face of the
LED in this application. Remember,
however, a diffuser MUST be used in front of it.
·
The close to monochromatic light is very distinctive
to use even in the presence of considerable ambient light. White light, is,
however, quite acceptable. I prefer red.
·
LEDs runs cooler than incandescent bulbs although this
is hardly a problem with very small bulbs.
A small piece of duct tape over the rear blocks
annoying light from reaching the eye.
It can also be used to hold the LED in place but it is better glued in
properly. Make sure the LED is square
to the frame when it is glued in place.
If not, illumination will not be as even as it could be. A Ronchi tester usually requires a larger area
of even illumination that a Foucault tester and it is worth spending some time
ensuring this.
Super Simple
grating/grating Mount
If you have a
quality grating, you may prefer to simplify this rig even
further because
you can leave out the
slit, its holder, and tilt adjustment.
Be aware that few photographically
derived gratings are of sufficient quality to
get the best out of this arrangement.
Unless you have a filled and etched grating,
make the slit version.
In any case, I do
suggest you make provision for the slit version of the test.
It is more
versatile, and in my opinion caters for slightly improved testing.
If you are using a
grating substitute, you MUST use the slit version.
With a substitute
grating and a slit, the test is in no way inferior.
This is so simple that you could make more than one
using different coloured LED’s in each.
I prefer a red LED but blue should show less diffraction effects. While in theory this sounds better, in
practice I do not think there is any compelling advantage to use a blue LED.
The LED, which is slightly tapered, is simply pushed
firmly into a 3/16 hole in a suitable material, which is ¼ inch thick. It will not come loose. To stop light spilling back into the eye, a
small piece of tape is placed over the rear of the LED. You could tape the grating in place but it
is better if it can be removed easily.
This facilitates changing gratings and removing the grating to
facilitate alignment of the mirror under test, which is illustrated under Starter Kit


This view from the front shows the grating and
diffuser temporarily removed so the LED is exposed. This would be used for alignment of the mirror, then the grating and
tracing paper clipped into place.
The entire frame is held in place by using a large
bulldog clip to hold it on the main post in the same way as has been previously
used.
Other Test Rigs
The aim of this section is to produce a simple rig and
reduce confusion to a minimum. Thus
many viable alternatives have deliberately been omitted
If you want to investigate alternate rigs, look under
Rigs. But, I still suggest, for a
newcomer, you should simply build something reasonable and immediately start to
use it. Only later, look at all of the
alternatives.
Alternative
Diffuser
The
diffuser, in an emergency, can be made of 3 or 4 layers of transparent sticky
tape. It is best if it is not clear but
frosted. If it is clear, mess up the
sticky surface of each piece with your finger before sticking the four pieces
together. Do not use this unless you have to and replace with something better
as soon as possible.
The best,
cleanest, longest lasting diffuser is made of glass ground on each side (diffuser ) but two layers of clean tracing
paper is quite OK as long as it is replaced as soon as it becomes dirty.
GOTO RONCHI INDEX