RONCHI RIGS
Simple
Shows a very simple test rig, which is easy and cheap to build.
GOTO RONCHI INDEX
Copyright – P. J.
Smith
But permission is
given to distribute this material in unaltered form as long as it is not sold
for profit.
A scheme
sometimes recommended for simple Ronchi Testing uses a strong white light
reflected from a 45 degree white surface.
A large grating is then placed so it overlaps the illuminated surface,
then extend past the edge of the assembly where the returned rays are viewed by
the eye.
A bed lamp,
or some lamp in a frame can be used in conjunction with a sufficiently large
grating. The diffusing surface may
simply be a sheet of drawing paper.
White light is quite satisfactory.
This scheme
works, but is not as useful as it sounds because :-
1.
It is
difficult to place the eye close enough to the grating to be useful. This becomes a problem when the grating is
placed in the most sensitive position where only one or two bands are visible.
2.
This
arrangement demands a large grating.
Unless the grating is of excellent quality, results are not very
useful. A grating made on film is in my
opinion quite unsatisfactory in this role.
Other options are very expensive. [1]
3.
Significant
heat from the lamp is detrimental. This
is especially true if the light is below the grating.
A useful
variation is shown below. This uses a
small flashlight taped to the aluminium body carrying the testing
elements. It uses a slit plus a cheap
grating - an alternative is of course a large grating quality of impeccable
quality. It is self-contained and may be moved around easily. If a close in scribed slit is used, this is
convenient for rough testing of small concave lens surfaces while they are on a
block.

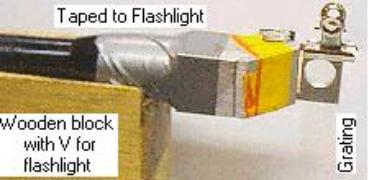
The Aluminium
body is made from a piece of box section as shown. A separate piece is glued to the open hypotenuse. It is frosted by fine wet and dry sandpaper
to diffuse the light and should NOT be polished.
The scribed
slit is stuck onto the front outside the first hole. See scribed slit.
On the right
is a long strip of grating. In this
case it is a transparent phase grating so is difficult to see in the
photograph. This is held onto the
inside of the aluminium with the small clip at the top. Other types of gratings may be used. [2]
Tilt is
adjusted by moving the bottom of the grating sideways, allowing it to pivot
under the clip.
Adjustment
is not difficult, especially if the grating is rigid.
Any grating
material is useable. The phase grating
material that is shown is so cheap and common that it can be treated as a
disposable item. A piece of wire gauze
also works, but do not cut the strip too narrow or it will distort as the
bottom is pushed sideways for tilt adjustment.
Once the
performance is checked, the slit and grating may be more permanently bonded or
clamped.
It is
possible to substitute a prism in this arrangement but the above arrangement is
quite satisfactory.
A Miniature Version
Another
variation of this method is to mount a LED and miniature 45 degree
diffusing/reflecting surface to the edge and front of a 35 mm slide
holder. A very small square section
brass tube can be used in a similar way.
Rather than attach the grating to the rest of the assembly as was done
above, the miniature source in this case is attached to the grating.
GOTO RONCHI INDEX